I don't know if you've noticed, but I appear to be taking this "every day" thing pretty loosely right now. I keep forgetting to be creative, and then sometimes realizing I was indeed creative after all accidentally, and sometimes not. I remembered that when I was in Whistler I really wanted to make soap, so I am going to investigate how to do so and maybe churn out something genuinely creative in the next three days... we'll see.
Anyway. For today, I have some pictures that I took! I have all these friends who are super good at taking pictures and are making businesses out of it, but don't go expecting anything Polly Photographer about these ones. My parents and I were in Sechelt for the day, and my dad was gallivanting around the rocks with my dog and I was left with the camera for safekeeping. It's a lot more fun to take pictures with a giant camera that makes the old-fashioned click-click sound when you press the button, so I took a bunch of pictures because I liked the sound. These ones are the best.
This one is my favourite. There were arbutus trees everywhere, and I love arbutus trees. They are so smooth! Plus I learned from an informational sign that sometimes arbutus trees look just like regular trees with rough bark, and then they shed their winter skin and become smooth and awesome. Like ninja snake trees!
These are arbutus trees mid-shed. Camouflage bark is gone, next step: peel.
There were a million purple starfish everywhere!
The ocean was so sparkly.
Day Twenty-Seven Highlights: cameras that sound old, arbutus trees.
Day Twenty-Seven Lowlights: nothing, really. It was pretty awesome.
Tomorrow: soap? I don't know. I'll try, though - I promise.
Saturday, August 21, 2010
Tuesday, August 17, 2010
Day Twenty-Six: Ikea picture frames (sigh) - updated
I thought today was day twenty-seven, and that I would only have two days left. But then I discovered that in fact, it is day twenty-six only. WILL THIS NEVER END. Discovery: I don't like doing things for thirty days. Especially when it's hot outside and I'm moving.
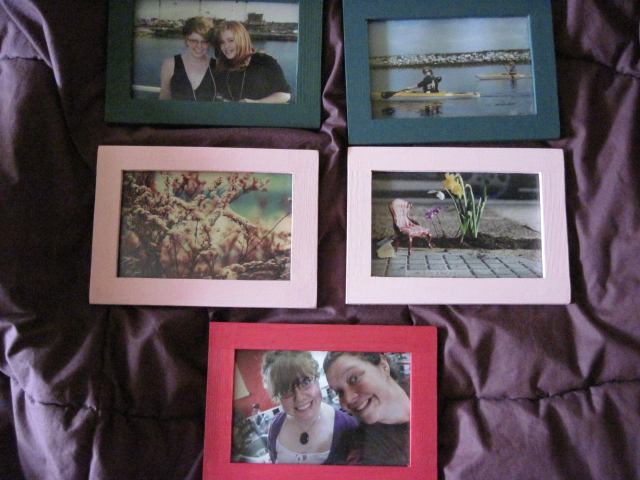
Anyway. I don't want to buy any more stuff, so I'm down to using what little I have left in my craft box. Today this meant painting Ikea picture frames. I have a bunch of pictures that I want to put up in my new apartment, with the picture frames painted to correspond - I'm sure it will look neat when it's all put together, but I forgot to order the pictures until just now so you can't see it put together until at least tomorrow. So for now it's pretty uninteresting.
Materials:
- frames
- paint
- paint brush
I learned that I really enjoy mixing primary colours together to make other colours. It's like an adventure! You have to be a colour detective. "Is teal more blue or more yellow than olive green? How many drops of red are allowed until it all turns brown?" It's very exciting. Except that I didn't end up making teal at all. I did it once before, when I painted that frame for my white board, but my directions for colour use weren't technical enough that I could re-create it.
This is what I started with:
And this is what I have now:
I'm fairly certain that I don't need to outline the process.
I have a vision for these frames and a mirror in my long front hallway. I'm sure it will look great. You can come visit, and decide for yourself!
Day Twenty-Six Highlights: being a paint detective.
Day Twenty-Six Lowlights: I'm pretty sure this barely constitutes a craft. That's a lowlight. Also, not being able to make teal.
Tomorrow: who knows. Who the heck knows.
UPDATED with the pictures inside them:
It does look better. Oh good.
Anyway. I don't want to buy any more stuff, so I'm down to using what little I have left in my craft box. Today this meant painting Ikea picture frames. I have a bunch of pictures that I want to put up in my new apartment, with the picture frames painted to correspond - I'm sure it will look neat when it's all put together, but I forgot to order the pictures until just now so you can't see it put together until at least tomorrow. So for now it's pretty uninteresting.
Materials:
- frames
- paint
- paint brush
I learned that I really enjoy mixing primary colours together to make other colours. It's like an adventure! You have to be a colour detective. "Is teal more blue or more yellow than olive green? How many drops of red are allowed until it all turns brown?" It's very exciting. Except that I didn't end up making teal at all. I did it once before, when I painted that frame for my white board, but my directions for colour use weren't technical enough that I could re-create it.
This is what I started with:
And this is what I have now:
I'm fairly certain that I don't need to outline the process.
I have a vision for these frames and a mirror in my long front hallway. I'm sure it will look great. You can come visit, and decide for yourself!
Day Twenty-Six Highlights: being a paint detective.
Day Twenty-Six Lowlights: I'm pretty sure this barely constitutes a craft. That's a lowlight. Also, not being able to make teal.
Tomorrow: who knows. Who the heck knows.
UPDATED with the pictures inside them:
It does look better. Oh good.
Sunday, August 15, 2010
Day Twenty-Five: shiny rocks
So... it was really hot yesterday. Basically all I did was sit on the couch in my air-conditioned living room with a fan fixed on me eating watermelon and reading. (I was eating the watermelon and reading, the fan was not.) Which sounds like a nice day, I think, except when you consider that I was being air-conditioned and fanned and still had gross sweat drops coming off my face.
Anyway. The moral of the story is that it was too hot to do anything yesterday. Except that I was accidentally creative! Mother and I went to the beach early in the morning, and collected rocks for the vases we both bought, and I like shiny rocks so I sprayed them with varnish. This morning I peeled them off the newspaper I varnish-glued them to, and realized that I think that counts as being creative. The varnish I used totally has a picture of crafts on it. I didn't take any pictures of the process, because I only realized my brilliance this morning. (This morning being Monday, but since the creativity happened on Sunday that is when the publish time of this post is. Ooooooh tricky internet.)
I still haven't remembered what the awesome thing I was going to do is, as I mentioned on day twenty-four, so I don't really know what I'm going to do today. Probably going to put it off for as long as possible and then work on my scarf. I'm fading, you guys. No more sewing machine stuff, even though I have some fabulous material and I still haven't built my reversible purse. In all honesty I think I will be decorating Ikea frames to put in my apartment. I KNOW. IKEA FRAMES. Welcome to Arts and Crafts for children.
Anyway. The moral of the story is that it was too hot to do anything yesterday. Except that I was accidentally creative! Mother and I went to the beach early in the morning, and collected rocks for the vases we both bought, and I like shiny rocks so I sprayed them with varnish. This morning I peeled them off the newspaper I varnish-glued them to, and realized that I think that counts as being creative. The varnish I used totally has a picture of crafts on it. I didn't take any pictures of the process, because I only realized my brilliance this morning. (This morning being Monday, but since the creativity happened on Sunday that is when the publish time of this post is. Ooooooh tricky internet.)
I still haven't remembered what the awesome thing I was going to do is, as I mentioned on day twenty-four, so I don't really know what I'm going to do today. Probably going to put it off for as long as possible and then work on my scarf. I'm fading, you guys. No more sewing machine stuff, even though I have some fabulous material and I still haven't built my reversible purse. In all honesty I think I will be decorating Ikea frames to put in my apartment. I KNOW. IKEA FRAMES. Welcome to Arts and Crafts for children.
Saturday, August 14, 2010
Day Twenty-Four: fridge pen holder
I'm all about accessorizing my fridge right now. My project for today sprang from the mind of not martha, but she used a Starbucks gum container and I am not made of money, so I searched high and low for something similar. The funny thing about this craft stuff is much of what I find is how to recycle old or broken things, but I don't have any of those old or broken things so I have to break nice things or buy things that I can recycle. I wish I was more of a hoarder so I could just sift through my miscellaneous belongings to find the materials I need, instead of going on hunts and buying stuff.
Anyway.
Materials:
- Methos gum container
- magnets
- scrapbooking paper
- liquid glue
- scotch tape
I was about to use a tic tac container (they make giant ones all of a sudden!) and then found a good-sized Menthos gum container that was cheaper.
First I discarded all the gum in the container (I don't really care for gum), peeled off the stickers, and took the lid off. The stickers left nice residue that made it easy to stick the paper on - I used damask again, which shouldn't come as a surprise to anyone. The thing about the one at not martha is that the tin case is easier to paint and put tissue on - I thought I could just wrap paper around the case and be done with it, but the top was gape-y and the green plastic was visible. So I got liquid glue all over my fingers and smeared it over the paper like paper-mache for the top, and then glued the paper on regular for the rest.
That was easy enough. Then I glued two magnets on the back, leaving room for a third in case pens were heavier than I anticipated, and waited for the glue to dry. WAITED. Luckily, it's vacuuming day so I was kept busy for a while.
Then I stuck it to the fridge with two pens inside to test the weight, and voila:
My fridge is the luckiest fridge of all, you guys. It's so pretty right now.
I was going to make a corresponding paper-holder, but it suddenly got a million degrees hotter and I can't focus on anything new. That might be my project for tomorrow.
Day Twenty-Four Highlights: peeling dried glue off fingers, magnets, damask paper.
Day Twenty-Four Lowlights: waiting for glue to dry, gum.
Tomorrow: the corresponding paper-holder, or else there was something else that I wanted to do but it's so hot that I forget right now. Probably it was something awesome, so you should stay tuned.
Anyway.
Materials:
- Methos gum container
- magnets
- scrapbooking paper
- liquid glue
- scotch tape
I was about to use a tic tac container (they make giant ones all of a sudden!) and then found a good-sized Menthos gum container that was cheaper.
First I discarded all the gum in the container (I don't really care for gum), peeled off the stickers, and took the lid off. The stickers left nice residue that made it easy to stick the paper on - I used damask again, which shouldn't come as a surprise to anyone. The thing about the one at not martha is that the tin case is easier to paint and put tissue on - I thought I could just wrap paper around the case and be done with it, but the top was gape-y and the green plastic was visible. So I got liquid glue all over my fingers and smeared it over the paper like paper-mache for the top, and then glued the paper on regular for the rest.
| top |
| rest |
That was easy enough. Then I glued two magnets on the back, leaving room for a third in case pens were heavier than I anticipated, and waited for the glue to dry. WAITED. Luckily, it's vacuuming day so I was kept busy for a while.
Then I stuck it to the fridge with two pens inside to test the weight, and voila:
My fridge is the luckiest fridge of all, you guys. It's so pretty right now.
I was going to make a corresponding paper-holder, but it suddenly got a million degrees hotter and I can't focus on anything new. That might be my project for tomorrow.
Day Twenty-Four Highlights: peeling dried glue off fingers, magnets, damask paper.
Day Twenty-Four Lowlights: waiting for glue to dry, gum.
Tomorrow: the corresponding paper-holder, or else there was something else that I wanted to do but it's so hot that I forget right now. Probably it was something awesome, so you should stay tuned.
Friday, August 13, 2010
Day Twenty-Three: ribbon frame
So these past three days I've been moving all my stuff to my new apartment, and I spent the majority of one afternoon washing all my dishes before I put them in cupboards. I don't have a dishwasher, but I do have a double-sink, so it was okay. However, there is a boring, empty expanse of wall above the sinks that I stared at the whole time, so I decided that I should make something to put there. My first thought was a mirror, because that's easy, but then I immediately nixed that for being too narcissistic, plus I might give myself a heart attack every once in a while. My mom suggested a bulletin board, which I then amended to one of those frames with the ribbon that you stick pictures and notes in. (I half-heartedly googled "ribbon frame" to find out the real name, but Google didn't know what I meant. The pictures will tell you what I mean. You've seen them before.)
Materials:
- largeish frame (Ikea)
- material (Value Village)
- ribbon (Precious Memories)
- thumbtacks (from my picture-hanging kit)
- good quality stapler
- needle-nosed pliers (optional)
- strong adhesive (optional)
I was excited about this project because I have a plethora of Ikea picture frames, but my taste is evolving in the way that I like my pictures to be in more interesting-looking frames, so I've got all these boring frames lying around. My first step was to remove the plastic from the frame, leaving only the frame itself and the cardboard backing.
Then I stretched fabric across it and stapled it to the frame. (I'm not sure if stapling was the best way to go about doing this, but I didn't consult any websites for advice since I can't remember what it's called, and a stapler was all I had.)
This was the only step which caused me any real trouble. I broke a nail pulling out a staple, wasted a lot of staples by not pushing hard enough, and broke my stapler for a bit. (I smashed it against the table a couple of times to fix it, and it worked! That never works!) My fingers look super weird in that picture, but that's because I had to push REALLY hard on the stapler to get anything to happen.
You have to do some fancy folding around the corners to keep the fabric tight, but I think it all worked pretty well. Then I got my ribbon, and stapled that to the outside edges of the frame.
Before I even began this thing I was worried I didn't have enough ribbon, and I ran out when I was 3/4 of the way finished. I had similar ribbon, but not identical, so two of the strands are more brownish than the others - I'm not sure if it looks okay, but I didn't want to go out and buy more ribbon. Also, I had to do some re-positioning on some after I'd finished them all, because I didn't measure or anything. Probably it would look better if you did, but I just made sure they were all perpendicular to each other.
Then I stabbed thumbtacks at each crossing point so they punctured the cardboard. My secret wish was that the cardboard would be enough to hold them in place, but some of them came popping off so I rooted through my dad's toolbox and found needlenosed pliers. With these I bent the backs of the thumbtacks to keep them from popping out. In the process I punched some holes in the back of the cardboard, so the thumbtacks popped out with their bent backs, so I found some Gorilla Glue in the laundry room and put some of that on the back of each thumbtack. (The instructions for the glue say you're supposed to dampen each thing you want to stick together, which I didn't, and then clamp it, which I also didn't. I also neglected to wear gloves, which you are supposed to, and I think I got some on my skin. Hopefully everything still works even though I blatantly disregarded every single instruction on the bottle.)
Then I waited for a million years for the glue to dry, which it did eventually, and then I stuck stuff in the ribbons, and now I am finished! I think I will also stick some small sewing pins on it to let me stick more stuff in it than just in the ribbons, because I want to cram it full of stuff.
I am so proud of this! I did it without even a plan in mind, or knowing what it was called! Sometimes I am so amazing.
Day Twenty-Three Highlights: coming up with a brilliant plan and succeeding, fixing things by smashing them, double-sinks.
Day Twenty-Three Lowlights: getting Gorilla Glue on my hands, waiting for things to dry, thumbtacks that pop out, running out of ribbon.
Tomorrow: I bought a pack of Menthos gum specifically so I could use the package for a pen holder to stick on my fridge, so probably I will make that tomorrow. If I can find somewhere to stick all the gum.
Materials:
- largeish frame (Ikea)
- material (Value Village)
- ribbon (Precious Memories)
- thumbtacks (from my picture-hanging kit)
- good quality stapler
- needle-nosed pliers (optional)
- strong adhesive (optional)
I was excited about this project because I have a plethora of Ikea picture frames, but my taste is evolving in the way that I like my pictures to be in more interesting-looking frames, so I've got all these boring frames lying around. My first step was to remove the plastic from the frame, leaving only the frame itself and the cardboard backing.
Then I stretched fabric across it and stapled it to the frame. (I'm not sure if stapling was the best way to go about doing this, but I didn't consult any websites for advice since I can't remember what it's called, and a stapler was all I had.)
This was the only step which caused me any real trouble. I broke a nail pulling out a staple, wasted a lot of staples by not pushing hard enough, and broke my stapler for a bit. (I smashed it against the table a couple of times to fix it, and it worked! That never works!) My fingers look super weird in that picture, but that's because I had to push REALLY hard on the stapler to get anything to happen.
You have to do some fancy folding around the corners to keep the fabric tight, but I think it all worked pretty well. Then I got my ribbon, and stapled that to the outside edges of the frame.
Before I even began this thing I was worried I didn't have enough ribbon, and I ran out when I was 3/4 of the way finished. I had similar ribbon, but not identical, so two of the strands are more brownish than the others - I'm not sure if it looks okay, but I didn't want to go out and buy more ribbon. Also, I had to do some re-positioning on some after I'd finished them all, because I didn't measure or anything. Probably it would look better if you did, but I just made sure they were all perpendicular to each other.
Then I stabbed thumbtacks at each crossing point so they punctured the cardboard. My secret wish was that the cardboard would be enough to hold them in place, but some of them came popping off so I rooted through my dad's toolbox and found needlenosed pliers. With these I bent the backs of the thumbtacks to keep them from popping out. In the process I punched some holes in the back of the cardboard, so the thumbtacks popped out with their bent backs, so I found some Gorilla Glue in the laundry room and put some of that on the back of each thumbtack. (The instructions for the glue say you're supposed to dampen each thing you want to stick together, which I didn't, and then clamp it, which I also didn't. I also neglected to wear gloves, which you are supposed to, and I think I got some on my skin. Hopefully everything still works even though I blatantly disregarded every single instruction on the bottle.)
Then I waited for a million years for the glue to dry, which it did eventually, and then I stuck stuff in the ribbons, and now I am finished! I think I will also stick some small sewing pins on it to let me stick more stuff in it than just in the ribbons, because I want to cram it full of stuff.
I am so proud of this! I did it without even a plan in mind, or knowing what it was called! Sometimes I am so amazing.
Day Twenty-Three Highlights: coming up with a brilliant plan and succeeding, fixing things by smashing them, double-sinks.
Day Twenty-Three Lowlights: getting Gorilla Glue on my hands, waiting for things to dry, thumbtacks that pop out, running out of ribbon.
Tomorrow: I bought a pack of Menthos gum specifically so I could use the package for a pen holder to stick on my fridge, so probably I will make that tomorrow. If I can find somewhere to stick all the gum.
Monday, August 9, 2010
[PAUSE]
Hey guys, I'm going to be on pause for a few days, as I am moving to Campbell River. I'll be back probably on Friday or something, be home for a week or two, and then move for real to stay. I'm not sure if decorating an apartment counts as being creative? Regardless, I will take pictures and post them and maybe they will count.
Sunday, August 8, 2010
Day Twenty-Two: glove squirrel
For some reason the needle I found in my sewing box was larger and less sticky than the one I put back in my sewing box last night. It still stabbed me a bunch of times, though.
I began by stuffing the pieces (minus the ears) with stuffing. This made them look better, I'm pleased to say, a little more uniform. I didn't notice until the end product that I stuffed one arm more fully than the other, so my squirrel kind of looks like that dude from that KFC commercial who has one GIANT arm and one puny arm. I mention this now instead of at the end so that you will know to be careful with how much you stuff.
Then I sewed the arms and tail shut and attached them on. When I got to the part about the head in the original instructions, they gave me a fancy way of sewing it shut so that it looked nice, and I think they should have mentioned that at the beginning. Why wouldn't you want the arms and tail to look as nice as the head? I don't know. Anyway, I will tell you the trick: fold the left side in, the right side in, the top side on top of those sides, and then finally the last side and sew it shut! It keeps all the fraying edges neat and tucked away.
But I got a bit ahead of myself. Before I did the head, I closed up the arms and tail and then attached them to the body in a haphazard manner. I'm still not sure how people can sew on extra pieces without the seams showing like Frankenstein. Tips?
Then I did the head, closing it up with the fancy instructions like they told me to. The ears were the easiest thing about this whole project. All you do is fold them in half and sew the bottom together, and that makes it look like a real squirrel ear, and then attach that to the head.
Then I sewed the head to the body, but I think I did it a little bit incorrectly because he doesn't have a neck and he looks a bit snobby.
The instructions called for a wood button, but I found a nice non-wood button in my sewing box, so I attached that. Then I was supposed to use embroidery thread for the eyes, I think because it's thicker, but I didn't have any so I just used regular black thread.
I began by stuffing the pieces (minus the ears) with stuffing. This made them look better, I'm pleased to say, a little more uniform. I didn't notice until the end product that I stuffed one arm more fully than the other, so my squirrel kind of looks like that dude from that KFC commercial who has one GIANT arm and one puny arm. I mention this now instead of at the end so that you will know to be careful with how much you stuff.
Then I sewed the arms and tail shut and attached them on. When I got to the part about the head in the original instructions, they gave me a fancy way of sewing it shut so that it looked nice, and I think they should have mentioned that at the beginning. Why wouldn't you want the arms and tail to look as nice as the head? I don't know. Anyway, I will tell you the trick: fold the left side in, the right side in, the top side on top of those sides, and then finally the last side and sew it shut! It keeps all the fraying edges neat and tucked away.
But I got a bit ahead of myself. Before I did the head, I closed up the arms and tail and then attached them to the body in a haphazard manner. I'm still not sure how people can sew on extra pieces without the seams showing like Frankenstein. Tips?
Then I did the head, closing it up with the fancy instructions like they told me to. The ears were the easiest thing about this whole project. All you do is fold them in half and sew the bottom together, and that makes it look like a real squirrel ear, and then attach that to the head.
Then I sewed the head to the body, but I think I did it a little bit incorrectly because he doesn't have a neck and he looks a bit snobby.
The instructions called for a wood button, but I found a nice non-wood button in my sewing box, so I attached that. Then I was supposed to use embroidery thread for the eyes, I think because it's thicker, but I didn't have any so I just used regular black thread.
My mom thinks he's cute.
Day Twenty-Two Highlights: completing yet another project, his face, finding mysteriously improved needles.
Day Twenty-Two Lowlights: never being as good as the example, getting stabbed by a needle, snobby squirrels.
Tomorrow: I have no aspirations for tomorrow. We'll see what happens.
Subscribe to:
Posts (Atom)